
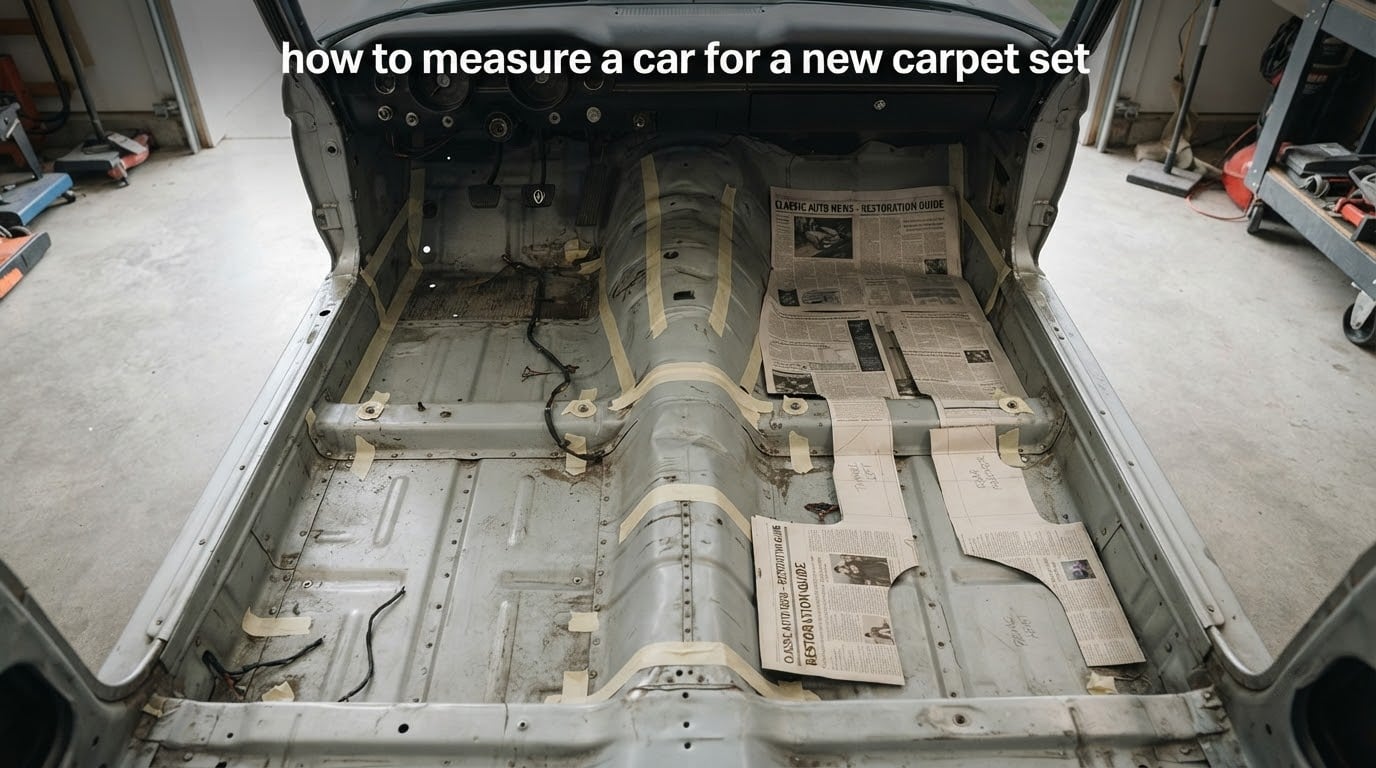
Measuring a car for a new carpet set sounds simple until you crawl into the footwell and realise the floor pan has more dips, humps, and bolt holes than you remembered. I learned this the hard way on my first restoration project, when a set of generic mats arrived three inches short on the driver side and had nowhere for the seat bolts to pass through.
In this guide, I will walk you through exactly how to measure a car for a new carpet set, including the tools you need, the difference between the template method and direct measuring, and the small details (like sill plate heights and seat belt cutouts) that decide whether your carpet ends up factory-fresh or a wrinkled mess. Whether you are restoring a classic car, refreshing a daily driver, or fitting a molded carpet kit for the first time, these are the same steps our team at Segal Motor Trimmings has refined over decades of trimming vehicles of every shape and size.
Table of Contents
- Why Accurate Measurement Matters Before You Order Carpet
- Tools and Materials You Will Need
- Preparing the Car for Measuring
- Measurement Basics for a Car Carpet Set
- How to Measure a Car for a New Carpet Set: Step-by-Step
- The Newspaper Template Method
- Direct Measurement Method
- Marking Hardware Holes (Seat Bolts, Seat Belts, Console)
- Transferring Measurements to the New Carpet
- Measuring for Molded vs Flat Carpet Sets
- Common Measurement Mistakes to Avoid
- Pre-Installation Checklist
- Frequently Asked Questions
- Final Thoughts on Measuring a Car for a New Carpet Set
Why Accurate Measurement Matters Before You Order Carpet
A new automotive carpet set is not a forgiving material. Once you cut it, there is no putting the piece back. Off by half an inch on the transmission tunnel and your carpet puckers. Miss a seat bolt hole and you are either drilling through the new carpet in the cabin or pulling it back out to start over.
Accurate measurement is what separates a one-day Saturday job from a three-week saga. It also protects the value of the carpet itself, because molded carpet kits, mass-backed carpet, and sound-deadened sets are not cheap to replace. Take the time now and you install once.
Tools and Materials You Will Need
Before you touch the floor pan, gather everything. I keep a single plastic tub for this job so nothing wanders off into the garage between sessions.
- Steel tape measure (at least 25 feet) for long runs across the floor pan and through the cabin.
- Folding ruler or rigid yardstick for narrow channels and the transmission tunnel.
- Masking tape and a Sharpie to mark reference points on the floor pan without leaving permanent marks.
- Old newspaper or kraft paper for the template method, plus a roll of wide masking tape to hold sheets together.
- Scissors and a fresh utility knife with sharp blades; dull blades chew carpet backing.
- Spray adhesive (3M 77 or similar) in case you are working directly on the new carpet.
- Heat gun or hair dryer to relax carpet that wants to fight you around curves.
- Awl, scribe, or scratch awl for locating existing bolt holes through a template.
- Notepad and camera to record and photograph every measurement before you forget which was which.
- Pencil, chalk, or white china marker for marking the carpet backing without bleeding through.
- Heavy gloves and safety glasses for the cutting and trimming stages.
Preparing the Car for Measuring
You cannot measure around seats, rails, and trim and expect an accurate template. Get the cabin empty first.
Start by disconnecting the battery so the seat belt sensors and airbag wiring cannot surprise you. Remove the front seats by unbolting the four seat bolts (usually 14 mm or 15 mm) and lifting each seat straight out with a helper if they are heavy. Slide the rear seat out or fold it up according to your vehicle, and pop the rear seat belts from their anchors if they block the rear footwell.
Next, remove the sill plates (the kick strips along the door sills) and any kick panels that cover the front floor edges. Pry gently with a plastic trim tool so you do not scratch the paint. Pull out the center console if your car has one. The goal is a fully exposed floor pan from firewall to rear seat and from sill to sill.
Finally, remove the old carpet and any old padding or sound deadener that is no longer bonded to the floor. Vacuum the metal so you can see every contour clearly. A clean floor pan is much easier to template than one hiding under years of debris.
Measurement Basics for a Car Carpet Set
Every carpet set, whether molded or flat, needs three categories of measurement: length, width, and contour depth. Length runs from the firewall to the back of the rear footwell (or into the trunk for a full cabin set). Width spans from the driver side sill to the passenger side sill, including the transmission tunnel in the middle.
Contour depth is what most DIY-ers skip, and it is where most mistakes happen. The floor pan is not flat. It rises at the footrest, dips for foot clearance, and climbs again over the transmission tunnel. Use your folding ruler to measure the height of each hump from the deepest dip, and the depth of each valley from the highest point. Write these down beside the length and width so the numbers stay paired with the location.
Also note the locations of every fixed obstacle: seat bolt holes, seat belt anchors, parking brake lever, climate control duct, wiring pass-throughs, and any factory dimples for the carpet retaining clips. These need to be marked on your template because the carpet has to clear them.
How to Measure a Car for a New Carpet Set: Step-by-Step
The exact sequence matters. Do these in order and each step builds on the last one.
Step 1: Sketch the Floor Pan From Above
Lay a large piece of kraft paper or tape several sheets of newspaper together so it covers one full footwell at a time. Draw the outline of the floor pan as you see it, including the transmission tunnel, footrest hump, and the curve where the floor meets the firewall.
Step 2: Mark the Fixed Reference Points
With the paper held in place, use an awl or sharp pencil to poke through the paper at every seat bolt, seat belt anchor, and clip dimple. These holes in your paper become your marker dots on the new carpet later.
Step 3: Take the Big Dimensions
Measure and record the length from the firewall to the rear of the footwell, the full width from sill to sill, and the width of the transmission tunnel. Write each measurement on the sketch next to the line it describes.
Step 4: Measure the Contour Heights
Use the folding ruler to capture how tall each hump is and how deep each valley drops. Note them on the sketch with a small plus or minus sign so you remember which is which.
Step 5: Move to the Rear Footwell
Repeat the same process for the rear passenger area. Note the hump in the middle where the driveshaft tunnel or exhaust runs, and any seat belt anchors that come up through the floor.
Step 6: Measure the Trunk or Boot
If your carpet set includes the trunk, measure the trunk floor length, width, and the depth of the wheel wells. Photograph the trunk from above before you remove anything so you remember the spare tire well location.
Step 7: Photograph Everything
Snap a photo of every sketch with the measurements visible. Cloud-storage backup means you can recover the numbers even if the paper goes missing in the shop.
The Newspaper Template Method
The newspaper template method is the gold standard when you are working without an existing carpet or when the old one is too far gone to use as a reference. It captures curves and dips that a tape measure simply cannot describe.
Tear or cut newspaper into manageable sheets and lay them across the floor pan one at a time, overlapping the edges by an inch or two. Tape each sheet to the one below it with wide masking tape so the whole template holds together as a single piece. Use smaller pieces of tape to fix the template to the floor pan so it does not slide while you work.
Once the entire floor is covered, walk the template with your hand and press firmly over every hump and into every valley. The paper will crease along the contours. Now lift the template off the floor in sections and transfer it to your workbench, where you can mark the carpet cut lines. Reviewers across restoration forums consistently credit this approach as the most accurate way to capture complex floor shapes.
Direct Measurement Method
If you are fitting a pre-formed molded carpet kit designed for your exact year, make, and model, the direct measurement method is faster. The kit already matches the floor pan, so you only need to confirm the fit and mark your hardware holes.
Lay the new carpet dry in the cabin without glue or fasteners. Press it into the footwells with your hands and knees, working from the centre outwards. Where the carpet naturally wants to sit is where it wants to sit. Do not force it into a shape the mold was not designed for.
Once it is seated, use your awl to push through the carpet at every seat bolt and seat belt location. Twist gently so the hole opens enough for the bolt to pass through later. Lift the carpet back out and trim the small X-cut at each mark with a razor blade, cutting from the back so the carpet face stays clean on top.
Marking Hardware Holes (Seat Bolts, Seat Belts, Console)
Hardware holes are the single biggest source of installation headaches. Get them wrong and the carpet either buckles around the obstruction or you end up cutting through the visible face of the carpet to clear it.
The classic technique, used across every restoration forum I have read, is to drop an awl or scratch awl through the carpet from the top side while pressing down on the bolt head from underneath. You feel the bolt, mark through the carpet, then cut a small X from the back. The X-cut relaxes open when the bolt passes through and lies flat against the hardware for a clean look.
For seat belts that anchor through the floor, the same approach works but go slowly. Seat belt anchors are often near the sill, where you cannot see the bolt from above. Use a flashlight or have a helper hold a mirror underneath while you mark from inside the cabin.
For the center console, mark the bracket holes before you bolt the console back down. The carpet has to slide under the console lips, so cut the carpet slightly larger than the bracket outline and let the console edge hide the cut.
Transferring Measurements to the New Carpet
With your template off the floor and your measurements recorded, it is time to mark the carpet itself. Always mark the back of the carpet, never the face. A pencil line on the carpet pile is permanent and almost impossible to remove.
Lay the new carpet face-down on a clean, flat workbench. Lay your newspaper template on top of it and tape the template in place with small pieces of masking tape at the corners. Use a silver Sharpie or white china marker to trace the outline of the template onto the carpet backing. Mark every bolt hole with a small circle and label it (driver front, passenger rear, etc.) so the marks are unambiguous when you cut.
If you used the direct measurement method instead of a template, drape the carpet in the cabin and mark the cutouts directly on the backing through the awl holes you made in the previous step.
Measuring for Molded vs Flat Carpet Sets
Molded carpet is pre-shaped to match a specific vehicle’s floor pan. The benefit is faster installation and a more factory look. The trade-off is that measurement is mostly a confirmation exercise, because the carpet already knows the shape. You mainly check that the year and body style match the kit, then mark your hardware holes.
Flat carpet is a single piece of material, usually with a mass backing, that you shape yourself over the floor pan using heat and adhesive. The trade-off is more work and more skill, but it lets you fit vehicles that do not have a molded kit available, and it gives you full control over the final shape. The trade-off is also more measurement responsibility, because every contour has to be cut by you.
If your vehicle is a common model with a molded kit available, the molded option saves hours of work. If you are working on a custom build or a vehicle with no kit, flat carpet with a careful template is the way to go.
Common Measurement Mistakes to Avoid
After years of helping customers troubleshoot carpet fit, I see the same handful of mistakes over and over. Watch for these and you will save yourself a re-order.
Measuring with the seats still in the car. You cannot see the floor pan and you will miss contour changes hidden under the seat rails.
Forgetting the sill plate height. The carpet tucks under the sill plate. If your template ends at the floor surface, you will have a gap along the door edge once the sill goes back on.
Skipping the transmission tunnel width. The tunnel is wider than it looks from the driver’s seat, especially in rear-wheel-drive cars. Measure at the firewall, mid-cabin, and at the rear seat.
Marking the carpet face instead of the backing. Permanent marks on the pile side are very hard to hide.
Cutting too aggressively. The universal rule from every restoration forum is measure twice, cut once, and trim conservatively. You can always cut more. You cannot add material back.
Ignoring the rear seat belt anchors. These bolts are easy to forget and even easier to cover with carpet by accident, leaving the seat belt unsecured.
Pre-Installation Checklist
Before you commit to cutting the new carpet, run through this final review.
- All seats, trim, and consoles are removed.
- Floor pan is clean and dry, with old adhesive and padding scraped off.
- Every seat bolt and seat belt anchor has been marked on your template.
- Measurements are written down and photographed as backup.
- Sill plate and kick panel heights are included in the template outline.
- Sound deadener or insulation has been installed if you are adding it.
- New carpet is acclimated to the cabin temperature for at least an hour.
- Utility knife has a fresh blade and you have spares on hand.
Frequently Asked Questions
How do you measure for new carpet?
Measure length from firewall to rear of footwell, width from sill to sill including the transmission tunnel, and the height of every contour. Use a steel tape for the big dimensions and a folding ruler for the dips and humps.
Is it hard to put new carpet in a car?
It is moderate work for a first-timer. Most people finish a basic install in a weekend, with the slowest part being accurate measurement and careful trimming around seat bolts and seat belts.
What measurements do carpet fitters use?
Professional carpet fitters use length, width, and contour depth at multiple points along the floor pan. They also record the exact locations of seat bolts, seat belt anchors, and any floor pan dimples for retaining clips.
How hard is it to recarpet a car?
Recarpeting a car is a weekend project for most DIY-ers. The hardest part is removing the old carpet and trim without breaking the brittle plastic clips, then accurately marking every hardware hole on the new carpet before cutting.
How to DIY car carpet?
Remove seats and trim, vacuum the floor pan, make a newspaper template or dry-fit the molded carpet, mark every bolt and belt hole on the back of the carpet, cut X-shapes from the back, then glue or press the carpet into place starting from the centre and working outwards.
What can I use instead of carpet in my car?
Common alternatives include rubber floor mats, vinyl flooring, spray-on bed liner coatings, or sound deadener panels with no carpet on top. Each has trade-offs in noise, comfort, and resale value compared to a fitted carpet set.
Final Thoughts on Measuring a Car for a New Carpet Set
Measuring a car for a new carpet set comes down to three habits: take your time, write everything down, and never trust a single measurement. The template method captures contours a tape measure misses, the direct method works when the kit already matches your floor pan, and the difference between a wrinkled install and a factory-fresh install is almost always about half an inch someone decided not to double-check.
Once your measurements are confirmed and your carpet is cut, the install itself goes quickly. Lay it in, work from the centre out, and let the carpet relax into its final shape before you start tightening down the trim. Our team at Segal Motor Trimmings is happy to help if you want a second set of eyes on your measurements before you commit to a cut.