
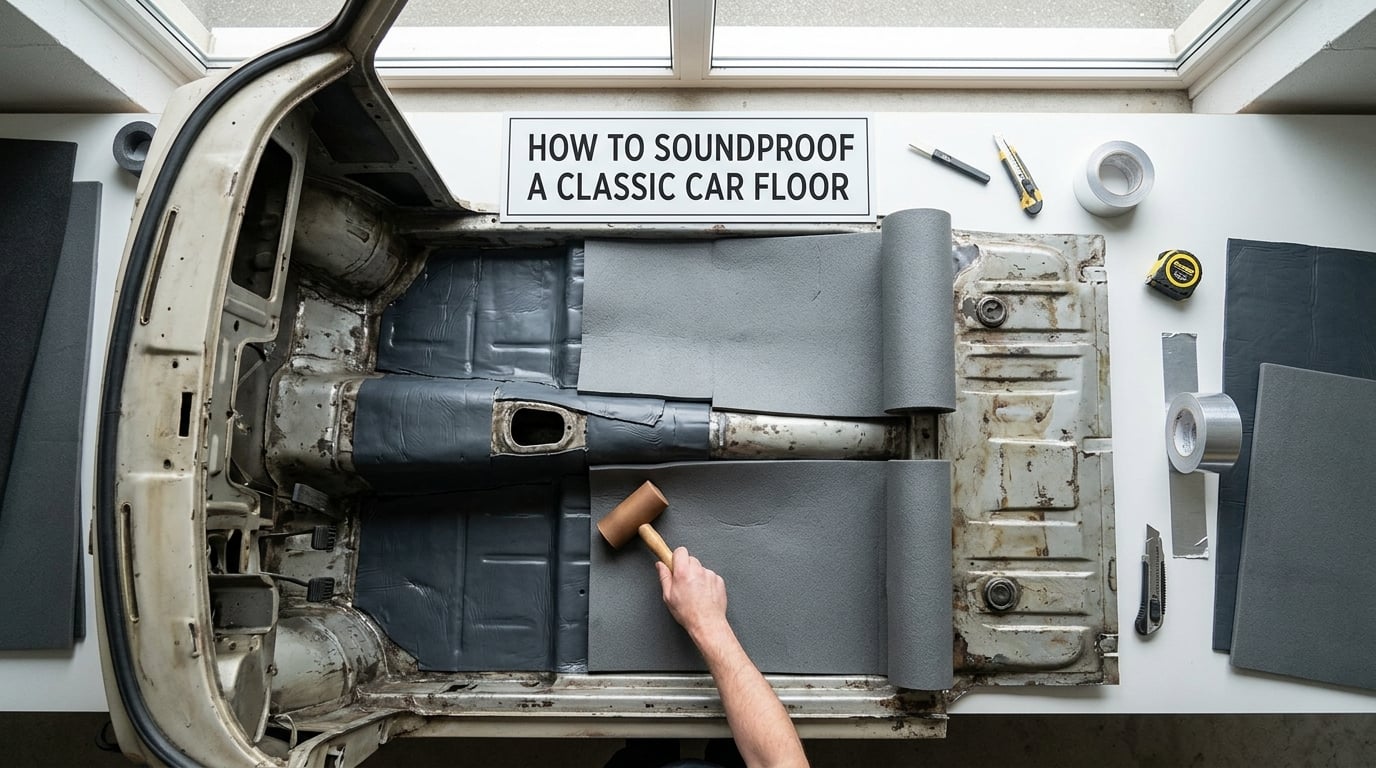
If you have ever driven a 1967 Mustang, a 1972 Chevelle, or a 1971 Datsun on the highway, you already know the issue: the floor is a drum, the heat is brutal, and every crack in the body panel sings along with the exhaust. Modern cars use layered dampers, foam barriers, and acoustic glass to keep the cabin quiet. Vintage cars typically shipped with a thin layer of tar-based deadener that is now half-dust.
In this guide, I will walk you through how to soundproof a classic car floor from start to finish. We will cover why classic floors behave differently than modern unibodies, the materials that actually work on vintage sheet metal, how to prep a 50-year-old floor pan without destroying it, and the step-by-step installation process our team has used on dozens of restorations. I will also share budget-friendly alternatives and how to preserve originality if your car is judged at shows.
By the end, you will know which products to buy, which to skip, how much material you really need, and how to avoid the most common mistakes that lead to rattles, trapped moisture, and rust surprises under the carpet.
Table of Contents
- Quick Picks for Classic Car Soundproofing
- Why Classic Car Floors Need Special Soundproofing
- Sound Deadening Materials for Vintage Floor Pans
- Preparing Your Classic Car Floor for Soundproofing
- How to Soundproof a Classic Car Floor: Step-by-Step
- Step 5: Apply the First Layer of Butyl Rubber Mat
- Step 6: Treat Hard-to-Reach Areas with Spray-On Coating
- Step 7: Add the Closed-Cell Foam Decoupler
- Step 8: Install Mass Loaded Vinyl (Optional)
- Step 9: Replace the Carpet Padding and Carpet
- Step 10: Reinstall the Seats and Trim
- Step 11: Test Drive and Listen
- Tools and Materials Checklist
- How Much Does It Cost to Soundproof a Classic Car Floor?
- Preserving Originality While Improving NVH
- Beyond the Floor: Doors, Firewall, and Trunk Soundproofing
- Frequently Asked Questions
- What is the best sound deadening material for classic car floors?
- How much does it cost to soundproof a classic car floor?
- Can you soundproof a classic car without removing the interior?
- Does sound deadening really work in classic cars?
- What is the difference between sound deadening and soundproofing?
- Should I soundproof the doors as well as the floor?
- Final Thoughts on Classic Car Floor Soundproofing
Quick Picks for Classic Car Soundproofing
If you only have a minute, here are the three material strategies I recommend for most classic car floor projects in 2026. Each fits a different budget and originality goal.
Best Overall: Layered Butyl Rubber + Closed-Cell Foam. This is the approach our team uses on daily-driver restorations. A butyl mat (such as Dynamat, Kilmat, or Hushmat) covers 60 to 80 percent of the floor pan, then a 6 to 10 mm closed-cell foam decoupler goes over the top. You get damping, mass, and a thermal break in one package.
Best Budget: Single-Layer Butyl with Closed-Cell Foam on Transmission Tunnel. Use one layer of mid-weight butyl (around 50 mils thick) on the floor, then spend your remaining material budget on the transmission tunnel and firewall because those carry the most noise and heat into the cabin.
Best for Show Cars / Originality: Reversible Closed-Cell Foam Under New Carpet Padding. Skip the adhesive mats entirely. Lay a quality closed-cell foam pad beneath the carpet. It lifts out for judging and adds measurable quieting plus heat insulation without permanently altering the floor pan.
Why Classic Car Floors Need Special Soundproofing
Classic cars need a different soundproofing approach than modern vehicles because they were engineered in an era when NVH (Noise, Vibration, and Harshness) was an afterthought. The floor pans on a 1965 Mustang or 1969 Camaro are simple stamped steel panels spot-welded to the frame rails. They have no foam backing, no asphalt-impregnated sheet, and no mass-loaded barrier as standard equipment.
What most classic cars did have was a factory undercoating and a thin layer of jute or asphalt-impregnated deadener glued under the carpet. After 40 to 60 years of heat cycles, that material has dried, cracked, and in many cases become a crumbly mess. When you pull up the carpet on a project car, you usually find a brittle black layer that flakes off in sheets. That is your first sign that the original damping is gone.
The other thing to understand is that vintage floor pans were never designed as a sealed acoustic chamber. There are large openings for the transmission tunnel, shifter, parking brake, and heater channels. Sound finds every one of those paths. Modern unibody cars have acoustic baffles molded into the floor; your classic does not. That is why a thoughtful layered approach matters so much.
Finally, there is the heat problem. Classic car floor pans sit close to the exhaust and engine. Without insulation, summer driving becomes uncomfortable and your carpet padding dries out and cracks. Adding a thermal barrier does double duty: it quiets the cabin and makes the car more usable in real weather.
Sound Deadening Materials for Vintage Floor Pans
Choosing the right sound deadening material is the single biggest decision you will make. Here is a clear breakdown of the four main categories and how each performs on vintage sheet metal.
Butyl Rubber Mats
Butyl rubber mats are the workhorse of classic car sound deadening. They are typically a 1.5 to 4 mm thick sheet of butyl rubber compounded with aluminum or other fillers, backed with a pressure-sensitive adhesive. When you press them onto bare metal, the mass and constrained-layer damping dramatically reduce panel resonance. This is the material most people think of when they hear Dynamat, Kilmat, or Hushmat.
On vintage floor pans, butyl rubber mats work extremely well because they conform to contours and add significant mass to thin steel. A 1968 Camaro floor pan is roughly 0.7 mm thick; adding 4 kg per square meter of butyl changes its resonant frequency dramatically. That is the physical reason a butyl mat quiets a floor panel.
The trade-off is weight and cost. A full-coverage butyl install on a two-door classic uses 12 to 18 sheets, which adds 20 to 35 kg to the car. It is worth it for a daily driver, but it is overkill for a concours trailer queen.
Closed-Cell Foam Decouplers
Closed-cell foam decouplers are the second layer in most modern soundproofing systems. They are typically 6 to 12 mm thick sheets of cross-linked polyethylene or EVA foam. Their job is to decouple the interior trim from the vibrating metal floor, which kills airborne noise transmission and adds a thermal break.
On classic cars, closed-cell foam is especially valuable because it absorbs exhaust heat that would otherwise radiate straight into the cabin. We typically use Dynaliner or a comparable product over the butyl mat. The result is a noticeably cooler floor in summer and a quieter ride at highway speeds.
Mass Loaded Vinyl (MLV)
Mass loaded vinyl is a dense, flexible barrier material that blocks airborne sound. In automotive use it usually appears as a 1.5 to 3 mm sheet with a mass of 2 to 5 kg per square meter. On classic cars, MLV is most useful as the top layer beneath the carpet when maximum quieting is the goal.
For most restorations, MLV is optional. You get 80 percent of the benefit from butyl plus closed-cell foam. If you are building a high-end resto-mod where cabin quietness matters more than weight, MLV on top of the stack pushes noise reduction another notch higher.
Spray-On Sound Deadener
Spray-on products like Lizard Skin have become popular in the classic car world because they reach tight areas you cannot easily mat. The transmission tunnel, firewall cavities, and inner frame rails are all places where a spray-on coating adds mass and damping that you simply cannot achieve with sheets.
The honest truth is that spray-on alone will not quiet a floor pan the way a butyl mat will. But as a complement to mats on hard-to-reach structural areas, it is genuinely useful. Most of the restoration shops I talk to use spray-on first, then layer mats on top.
Material Comparison Table
The table below summarizes how the four main material categories compare on the factors that matter most for classic car floor work. Use it to choose the right mix for your budget and originality goals.
Comparison: Sound Deadening Materials for Classic Car Floors
- Butyl Rubber Mat: Damping performance is high. Heat insulation is moderate. Cost per square meter is mid-range. Ease of install on vintage contours is good with a roller.
- Closed-Cell Foam Decoupler: Damping performance is low by itself. Heat insulation is high. Cost per square meter is mid-range. Ease of install is excellent because it is forgiving.
- Mass Loaded Vinyl (MLV): Damping performance is moderate. Heat insulation is moderate. Cost per square meter is high. Ease of install is moderate because it is heavy and stiff.
- Spray-On Coating: Damping performance is moderate. Heat insulation is moderate. Cost per square meter is moderate. Ease of install on hard-to-reach areas is excellent; on large flat areas it is slow.
Preparing Your Classic Car Floor for Soundproofing
Preparation is where most DIY installations succeed or fail. Skipping steps here leads to mats that lift in summer heat, rust that keeps growing under the deadener, and rattles that never go away. Set aside a full weekend just for prep if this is your first time opening up a vintage floor.
Step 1: Remove the Seats, Carpet, and Original Deadening
Pull the seats, console, carpet, and any jute padding. On a 50-year-old car the original deadening is usually cracked tar paper or asphalt-impregnated felt. It comes off in chunks. A heat gun, a stiff putty knife, and a wire brush are your best friends here. Many forum users on chevelles.com and vintage-mustang.com describe this step as the most labor-intensive part of the entire job. Budget 4 to 8 hours for full removal.
Step 2: Inspect for Rust
Once the original material is gone, look closely at every square inch of floor pan. Pay special attention to the rear footwells, the area under the battery, and the trunk floor extension. These are the spots where moisture collects on a vintage car. Probe anything that feels soft with an awl or screwdriver.
If you find surface rust only, treat it with a phosphoric acid converter (Ospho is the classic choice) and seal it with a rust-inhibiting primer. If you find scale rust or actual holes, patch the panel before applying any sound deadening material. Sound deadener over active rust traps moisture and accelerates the problem.
Step 3: Clean and Degrease
Vacuum everything, then wipe all bonding surfaces with isopropyl alcohol or a dedicated panel-prep solvent. Any leftover wax, grease, or adhesive residue will prevent the butyl mat from sticking properly. This is one of the most common causes of mats peeling up six months after install.
Step 4: Dry-Fit Your Material
Before you peel any backing paper, lay your butyl sheets on the floor and plan the layout. Start at the deepest part of the footwell and work outward. Cut around brake and clutch pedals, the parking brake, and the shifter boot. A clean dry-fit means you will not be stuck with a sheet of butyl stuck to itself halfway through the job.
How to Soundproof a Classic Car Floor: Step-by-Step
Now that your floor is clean, dry, and rust-free, you can begin installing the soundproofing system. The process below assumes a layered approach (butyl mat plus closed-cell foam decoupler), which is what I recommend for the majority of classic car restorations. Adapt quantities if you chose a different strategy from the Quick Picks above.
Step 5: Apply the First Layer of Butyl Rubber Mat
Start at the driver-side footwell. Peel the backing from one corner of your butyl sheet, press it onto the metal, then gradually work across the sheet with a hand roller. A wallpaper seam roller or a dedicated sound deadening roller gives you the pressure needed for a permanent bond. Air pockets are the enemy here; they hold moisture and reduce damping.
Cover the entire floor pan, the transmission tunnel, and as much of the firewall as you can reach. On a typical two-door classic you will use 12 to 18 sheets of butyl mat. Overlap seams by about 6 mm and roll every seam flat. Cut clean openings for pedals and the shifter using a sharp utility knife.
Step 6: Treat Hard-to-Reach Areas with Spray-On Coating
Inside the frame rails, the heater channel, and any boxed sections you cannot reach with a mat, apply a spray-on sound deadener like Lizard Skin. Two coats are standard. This step is optional if you are on a tight budget, but it is the difference between an average job and a great one.
Step 7: Add the Closed-Cell Foam Decoupler
Lay the closed-cell foam over the butyl-covered floor. Cut pieces to fit each footwell, the transmission tunnel, and the area beneath the rear seat if you removed it. Closed-cell foam is more forgiving than butyl; you can leave small gaps at the edges without losing much performance. Use a quality spray adhesive (3M 08090 or equivalent) on the back of the foam to hold it in place until the carpet goes down.
Step 8: Install Mass Loaded Vinyl (Optional)
If you are going for maximum cabin quietness, lay MLV on top of the closed-cell foam. MLV is heavy and awkward to work with, so cut pieces to fit on a flat surface first. Use foil tape or spray adhesive to seam pieces together; any gap lets noise through. This step adds roughly 10 to 15 kg but reduces cabin noise another 3 to 5 dB at highway speeds.
Step 9: Replace the Carpet Padding and Carpet
Install a quality closed-cell carpet pad (such as the mass-backed padding sold by most classic car trim suppliers) and then your new carpet. The pad adds a final layer of decoupled mass and protects the carpet from the rougher materials below. Trim carefully around the shifter, parking brake, and seat mounts.
Step 10: Reinstall the Seats and Trim
Reinstall the seats, console, and any trim pieces you removed. Torque the seat bolts to factory spec and double-check that nothing is pinching or rubbing against the new soundproofing layers. A loose seat bracket on top of a butyl-covered floor will rattle every time you hit a bump.
Step 11: Test Drive and Listen
Take the car for a 30-minute drive on a mix of city streets and highway. Listen for new rattles (usually a seat bracket or a trim clip) and for any areas where the butyl mat may not have bonded fully. If you hear a buzz, peel the suspect mat, clean the metal again, and reapply with extra roller pressure.
Tools and Materials Checklist
Here is the complete kit our team uses on a typical classic car floor soundproofing job. Quantities assume a two-door coupe or small sedan; scale up for larger vehicles.
- Heat gun: for softening old tar-based deadener during removal
- Stiff putty knife and wire brush: for scraping and brushing old material off
- Phosphoric acid rust converter: to treat any surface rust discovered during prep
- Isopropyl alcohol or panel-prep solvent: for final cleaning before mat application
- Utility knife with fresh blades: for cutting mats and foam cleanly
- Seam roller or sound deadening roller: for proper adhesion of butyl mats
- Butyl rubber mat: 12 to 18 sheets for full floor coverage on a two-door classic
- Closed-cell foam decoupler: 6 to 10 mm thick, sized to floor pan area
- Spray adhesive: 3M 08090 or equivalent for holding foam in place
- Spray-on sound deadener: optional, for frame rails and hard-to-reach cavities
- Mass loaded vinyl: optional, for top-layer noise barrier
- Quality carpet padding: mass-backed closed-cell foam pad
- New carpet: if reusing existing carpet, plan on deep cleaning or replacement
How Much Does It Cost to Soundproof a Classic Car Floor?
The honest answer depends on how much of the floor you cover and which materials you choose. Here is a realistic breakdown of what a typical classic car owner spends in 2026 for the three common tiers.
Budget Tier (single-layer butyl plus closed-cell foam): Expect to spend on materials for a two-door classic. That covers roughly 60 percent coverage with butyl, full coverage with closed-cell foam, and a new mass-backed carpet pad. It is a real, measurable improvement and is what I recommend for first-time installers.
Mid-Range Tier (full butyl plus closed-cell foam plus spray-on for cavities): The mid-range tier is where most daily-driver restorations land. You cover the entire floor with butyl, lay closed-cell foam over the top, and add spray-on coating inside frame rails and the transmission tunnel. Cabin noise drops 4 to 6 dB on average.
Premium Tier (full butyl plus closed-cell foam plus MLV): The premium tier adds mass loaded vinyl on top of the foam layer. You will see the largest reduction in road noise and exhaust drone. It is also the most labor-intensive and the heaviest. Worth it for a resto-mod, overkill for a car that mostly sees weekend shows.
Whichever tier you choose, the labor time is roughly the same: 12 to 20 hours for a first-time DIYer on a two-door coupe, including rust work. That is the part most people underestimate. The materials themselves are only half the project.
Preserving Originality While Improving NVH
If your car is judged at concours events, originality matters. The good news is that you can dramatically improve NVH without making any irreversible changes to the floor pan. Here is how I approach originality-preserving soundproofing.
First, document the original deadener before you remove it. Photograph the type, thickness, and coverage pattern. Some judging organizations accept modern replacements if they are documented and reversible.
Second, choose reversible materials wherever possible. Closed-cell foam under the carpet lifts out in minutes. Quality butyl mats can be removed with a heat gun and adhesive remover without damaging the underlying paint or primer. Mass loaded vinyl is similarly reversible.
Third, avoid spray-on products that bond permanently to the floor pan. Lizard Skin and similar coatings are excellent but cannot be removed without abrasion. For a show car, skip the spray-on layer and stick with sheet products only.
Fourth, keep the original factory deadener bagged and stored. If a future owner wants to return the car to factory spec, they can. This small step preserves resale value and shows respect for the cars history.
Beyond the Floor: Doors, Firewall, and Trunk Soundproofing
Once the floor is sorted, you will likely notice that doors, the firewall, and the trunk are now the loudest parts of the cabin. That is normal. Treating the floor removes the largest panel area, but smaller panels still radiate noise.
Doors are next on most owners lists because they are close to your ears. Apply butyl mat to the outer door skin (accessible through the interior door panel) and a layer of closed-cell foam behind the door panel itself. Two layers per door typically drop interior noise another 2 to 3 dB.
The firewall and trunk are next. On classic cars, the firewall is often just a thin panel between you and the engine. Adding mass loaded vinyl or a heavy butyl mat to the engine side of the firewall (when accessible) reduces engine noise dramatically. The trunk floor benefits from the same layered approach as the cabin floor.
Frequently Asked Questions
What is the best sound deadening material for classic car floors?
The best sound deadening material for classic car floors is a layered system: butyl rubber mat as the first layer for damping, closed-cell foam as a decoupler and thermal barrier, and optionally mass loaded vinyl on top for maximum airborne noise reduction. A single layer of butyl alone provides measurable improvement, but the layered approach delivers the biggest cabin quietness gain per dollar for vintage floor pans.
How much does it cost to soundproof a classic car floor?
The cost to soundproof a classic car floor ranges from a budget tier using single-layer butyl plus closed-cell foam, to a mid-range tier with full butyl coverage and spray-on treatment of cavities, to a premium tier that adds mass loaded vinyl on top. Materials for a two-door classic span a wide range depending on tier and brand, while labor runs roughly 12 to 20 hours for a first-time DIYer.
Can you soundproof a classic car without removing the interior?
You can partially soundproof a classic car without removing the interior by adding closed-cell foam pad under a new carpet, but you cannot fully treat the floor pan without removing seats and carpet at minimum. The largest gains require direct access to bare metal so butyl mats can bond properly and rust can be inspected and treated.
Does sound deadening really work in classic cars?
Yes, sound deadening works very well in classic cars because vintage floor pans are thin stamped steel with minimal factory damping. Adding butyl mass and a closed-cell foam decoupler typically reduces cabin road noise by 4 to 8 dB at highway speeds, which most drivers describe as a major improvement in comfort and driving enjoyment.
What is the difference between sound deadening and soundproofing?
Sound deadening refers to materials that reduce vibration and panel resonance, like butyl rubber mats, which convert vibrational energy into small amounts of heat. Soundproofing is the broader goal of blocking sound transmission through any barrier, which usually requires both damping layers (butyl) and decoupled mass (closed-cell foam, MLV) to address airborne noise as well as structure-borne noise.
Should I soundproof the doors as well as the floor?
Yes, soundproofing the doors in addition to the floor is recommended because doors are thin panels close to your ears and they radiate road and wind noise directly into the cabin. A butyl mat on the outer door skin plus closed-cell foam behind the door panel typically reduces interior noise another 2 to 3 dB and is a logical next step after the floor is treated.
Final Thoughts on Classic Car Floor Soundproofing
Learning how to soundproof a classic car floor is one of the highest-value upgrades you can make to a vintage daily driver. The cabin transforms from a buzzy, hot tin can into something that genuinely feels comfortable at modern highway speeds. The materials are affordable, the tools are common, and the skills required are well within reach of anyone who has done basic restoration work.
Start with proper prep, choose a layered system that matches your budget and originality goals, and take your time with the roller work. If you want a recommendation tailored to your specific vehicle, our team at Segal Motor Trimmings has decades of experience with classic car interiors and is happy to talk through material selection, panel removal, and what to expect on your particular model. Reach out before you start so we can help you avoid the common pitfalls.