
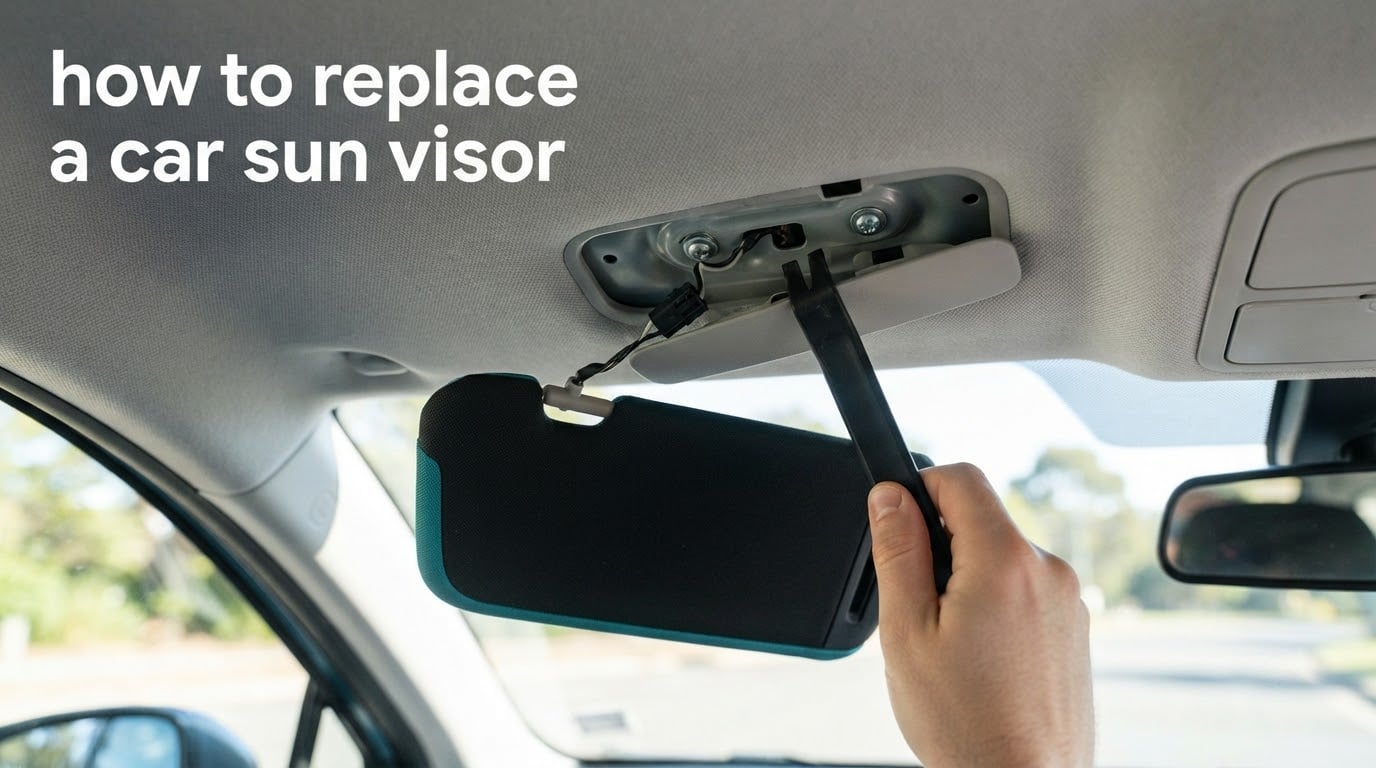
A car sun visor comes off by releasing its pivot, prying off the small plastic trim cover at the base, backing out two mounting screws, unplugging the vanity light connector, and sliding the visor off its post. The new part goes on in the reverse order.
That is the whole job on most vehicles, and it takes most people 10 to 20 minutes once the trim cover is off. I have watched owners spend an hour fighting the same pivot before realising they were pulling instead of sliding.
Difficulty: Beginner to intermediate. Tools: Basic hand tools, no specialty equipment. Time: 10 to 20 minutes per visor, plus sourcing the part. Best done: In daylight with the car parked and the ignition off.
Why bother? A drooping visor blocks your view of the road, rattles on rough pavement, and usually signals that the internal pivot mechanism has worn through. On many modern cars, tightening the mounting screws will not bring it back up, because the screws only hold the visor body while a separate ratchet inside the headliner is what locks the position.
I put this guide together for 2026 so you can diagnose the failure, pick the right part, and finish the swap without tearing your headliner. Everything below applies to most sedans, SUVs, and trucks from the last three decades, with notes for the exceptions.
Safety note before you touch anything: A sun visor sits directly beside the curtain airbag in the A-pillar and roof rail. Never drive with the headliner peeled back, never pry near the airbag seam, and keep metal tools out of the roof rail. If your car has a panoramic sunroof, treat the front roof rail as a no-touch zone.
Table of Contents
- Tools and Materials Needed to Replace a Sun Visor
- How to Replace a Car Sun Visor: Step by Step
- Step 1: Park, open the doors, and lower the visor
- Step 2: Open or remove the plastic trim cover at the base
- Step 3: Back out the mounting screws or bolts
- Step 4: Unlock the pivot before you slide the visor off
- Step 5: Disconnect the electrical connector for the vanity light
- Step 6: Fit the new visor and reconnect
- Step 7: Snap the trim cover back on
- Step 8: Test everything before you close the doors
- Why Your Visor Droops and Why Tightening Screws Will Not Fix It
- Choosing the Right Replacement Part
- Where to Buy a Replacement Sun Visor
- DIY or Shop: What Each Route Actually Involves
- Protecting the Headliner and Working Safely
- Programming HomeLink After a Replacement
- When a Damaged Mounting Post Changes the Job
- Troubleshooting After Installation
- Frequently Asked Questions
- Is it easy to replace a sun visor in a car?
- Can you replace a sun visor yourself?
- What tools are needed to replace a sun visor?
- How long does it take to replace a sun visor?
- How to fix a sun visor that keeps falling down?
- Are sun visors interchangeable between cars?
- Where can I buy a replacement sun visor?
- Do I need to disconnect the battery before removing the vanity light wiring?
- Wrapping Up Your Sun Visor Replacement
Tools and Materials Needed to Replace a Sun Visor
Nearly every visor swap uses the same small kit. Gather everything before you start, because a missing bit size turns a 15 minute job into an hour.
- Plastic trim removal tool or a thin plastic card to pop the trim cover without gouging the headliner
- Flathead screwdriver for the trim cover and pivot release on many vehicles
- Phillips screwdriver for the mounting screws on most Japanese and domestic models
- Torx bit set for several European and some Asian makes, commonly Torx T20 or T25
- Socket and ratchet set for models using Torx or hex bolts instead of screws
- Work light or flashlight to see inside the visor cavity
- Painter tape or masking tape to protect headliner fabric at the mounting point
- Gloves to avoid cut fingers from the plastic bracket and to hide fingerprints on the new part
- The replacement visor itself, confirmed for the correct side, roof type, and interior colour
You do not need a trim tool kit, a torque wrench, or any specialty airbag tool. If someone tells you this job requires pulling the entire headliner down, ask them what model year they are working on first.
A small magnetic tray or a folded piece of cardboard for the two screws is worth having. Dropped roof screws are a real headache to retrieve from inside a headliner.
How to Replace a Car Sun Visor: Step by Step
This is the core procedure. Work on one visor at a time so you can use the working side as a reference for the other.
Step 1: Park, open the doors, and lower the visor
Park on level ground, switch the ignition off, and fully rotate the visor down so the vanity mirror faces you. The pivot is fully extended in this position, which is the only state where it will release.
If the visor is stuck in the down position, work it back up gently by hand first. Forcing it from a jammed position is how pivot posts bend.
Step 2: Open or remove the plastic trim cover at the base
At the inboard end of the visor, where it meets the headliner, there is a small plastic cover plate. Slide your trim tool or card under the edge and lift it straight out.
Pull toward you, not upward, and keep the tip shallow. The headliner fabric sits directly behind that cover and a deep pry will puncture it. On some vehicles the cover unscrews rather than clips out.
Warning: If a plastic clip snaps on removal, replace the trim cover with the visor rather than forcing the old one. A missing cover lets the fastener head grind into the headliner fabric over time.
Step 3: Back out the mounting screws or bolts
You will usually see two fasteners once the cover is off: a long screw or bolt through the pivot post, and a second screw into the mounting bracket. Back both out completely and place them in your tray.
Note the order and which fastener goes where, because on many models they are different lengths. Support the visor with one hand as the last fastener comes free so its weight does not pull on the wiring.
Step 4: Unlock the pivot before you slide the visor off
This is the step that separates a clean removal from a broken mounting post. The visor slides along a bar or rod that runs inside the headliner.
Depress or rotate the pivot release control at the inboard end, hold it, and slide the visor body outboard along the post. Do not pull the visor down and away from the roof. Force-pulling is the single most common cause of the bent post failures people try to repair online.
Owners on benzworld.org describe this slide-along-the-bar method as the correct technique, because the internal frame stays inside the headliner. Once the shell clears the post, the whole visor assembly comes free in your hand.
Step 5: Disconnect the electrical connector for the vanity light
On visors with illuminated mirrors, you will find a small wiring connector at the back of the light assembly or near the pivot. Press the locking tab and pull the plug straight out. Do not tug on the wires.
Older connectors get brittle with heat cycles. If the tab is already cracked, lift it gently with a small flathead rather than pulling harder. If the connector is fused solid, the visor shell can often be replaced while the original bracket and wiring stay in place.
Step 6: Fit the new visor and reconnect
Slide the new visor onto the post the same way it came off, then reinstall the bracket screw first and the pivot screw second. Hand-tighten both until they are snug, then add a quarter turn.
Do not overtighten. The threads sit in plastic and a driver-heavy hand will crack the visor housing or strip the bracket. Several owners report cracked shells that started as an over-tightened screw.
Reconnect the vanity light plug until it clicks, then tuck the wiring harness back into the headliner cavity so it is not pinched between the bracket and the roof. A pinched harness causes flicker or a light that only works at certain angles.
Step 7: Snap the trim cover back on
Align the cover plate and press it into place until every clip seats. The fastener heads should be fully covered. Check that the visor still pivots freely through its full range and that it holds position when pushed up.
If the visor will not lock in the up position, the pivot ratchet did not engage. Cycle it down and up firmly, then check for a foreign object or a misaligned shell blocking the pawl.
Step 8: Test everything before you close the doors
Test the visor in the up position, the down position, and the pivot transition. Turn the vanity light on and let it run for a minute, then push the visor up and down again to see whether the light flickers.
Owners report a realistic replacement time of 10 to 15 minutes once the trim cover is off, which matches what we see. If something feels wrong, stop and recheck the connector and the post alignment rather than tightening harder.
Why Your Visor Droops and Why Tightening Screws Will Not Fix It
A visor is held up by a ratchet inside the pivot, not by friction from the mounting screws. Once the plastic ratchet teeth wear or a spring inside the pivot weakens, the arm walks back down and stays down.
- Droops immediately after installation usually means the shell is not seated fully on the post, or the part is not the correct design for your roof
- Rattles or clicks over bumps points to a loose bracket or a stripped screw hole rather than a failed pivot
- Vanity light out or flickering is a connector or bulb problem, and can be repaired without replacing the visor
- Cracked cover or shattered mirror means the shell is compromised and should be replaced for the fragments
- Wont stay up but moves smoothly is the classic worn ratchet
If your only symptom is droop, check the screw tension first with the visor in the down position. If the screws are snug and the visor still will not hold, the pivot is finished and no amount of tightening will change that. That fact alone saves people from replacing a perfectly good visor twice.
Choosing the Right Replacement Part
Sun visors are not interchangeable across sides, and they vary more than most catalogues suggest. Get these four things right before you order.
Driver side versus passenger side
Driver side visors are almost always longer, sit closer to the A-pillar, and on many models carry a HomeLink or universal transceiver button plus a larger illuminated mirror. Passenger side visors are shorter, sit further inboard, and often have no wiring at all.
Tell them apart by the label moulded into the plastic or by the position of the mirror. A part with wiring going nowhere is a passenger visor on a driver position, and vice versa.
Roof type matters
Cars with a panoramic sunroof frequently use a different visor bracket and a different mounting angle than the same model with a standard roof. The visor also sits closer to the roof rail, which means less room for your fingers and more reason to be careful with the trim tool.
Match the interior colour code
The interior trim code is usually on a placard on the driver door jamb, the glove box lid, or the sun visor itself. Match the code, not just the colour name. Two shades of beige from different years can look completely different side by side in direct sun.
Features have to match
Decide up front whether you need the illuminated mirror, the HomeLink button, and the universal transceiver. Swapping a plain visor in where a HomeLink unit used to leaves a hole in the headliner and an unused connector hanging loose.
Where to Buy a Replacement Sun Visor
You have four realistic sourcing routes, and they suit different situations.
- Dealership parts counter gives you the exact part for your VIN, including colour and features, and is the safest choice for a vehicle with HomeLink or a panoramic roof
- OEM or aftermarket suppliers online are usually the fastest route and let you compare colour codes and part numbers side by side
- Salvage yards and self-service wreckers let you pull a used OEM visor and confirm the colour and markings in person. Pull-a-Part users report finding visors for a small fraction of new-part cost this way
- Transferring the original mechanism into a replacement shell, which owners on 6-pack forums describe as a way to keep the original bracket and mounting hardware
When buying used, check the sun visor from a donor car carefully. Look for cracks around the pivot, a visor that will not hold the up position, mirror glass with chips or desilvering at the edges, and a trim cover with missing clips. Check the part number against your own before you leave.
Ask a parts counter for your visor part number using the VIN. It removes the single most common cause of a wrong part arriving, which is matching on appearance alone.
DIY or Shop: What Each Route Actually Involves
Parts pricing moves constantly, so check current figures for your vehicle before you decide. What stays consistent is how much work sits behind each option.
- Do it yourself takes 10 to 20 minutes per visor with basic hand tools, and the only real risk is headliner damage from rushing the trim cover
- Independent trim or upholstery shop charges a modest labour rate for a job most of them have done many times, and this is the best value route if a mounting post is already damaged
- Dealership will typically quote the full headliner removal when a post is broken, because the post sits inside the roof structure. Owners on r/car describe a dealership quote for that full job on a vehicle where a direct visor swap would have solved it
For a straightforward swap on a healthy roof, DIY is the clear answer. If the mounting post is bent or missing, the headliner comes down, and that is a different project with a different risk profile.
Protecting the Headliner and Working Safely
The headliner is the only part of this job you cannot easily replace. A few habits prevent nearly all damage.
- Tape the headliner fabric around the mounting point before you pry anything
- Use a plastic trim tool rather than a metal screwdriver for the cover
- Support the visor instead of letting it hang by the wiring
- Keep hands, tools, and the visor shell clear of the A-pillar and roof rail where the curtain airbag runs
- Work with the doors fully open so nothing swings back into the headliner
Nobody should drive with the headliner loose or a visor missing, regardless of distance. Loose trim near the roof rail is a known projectile risk in a crash, and an absent visor leaves a hard edge above the windscreen.
Programming HomeLink After a Replacement
If your new visor has a HomeLink or universal transceiver button, you will need to program it again. Most units use a long-press then short-press sequence on a single button.
- Press and hold the button until the indicator light starts blinking slowly
- When it blinks slowly, press it again to start learn mode
- Move your remote to a spot with clear line of sight to the garage door receiver, then press and hold the remote transmit button
- Stop when the indicator blinks rapidly, which confirms the code was accepted
- Test the door before you close the visor and drive off
Some vehicles need the button pressed twice in quick succession to cycle through the three available channels. If the light never blinks, the visor likely has no transceiver, and you are trying to program a garage remote that is not there.
When a Damaged Mounting Post Changes the Job
If a visor was force-pulled in the past, the post inside the headliner may be bent or sheared off. That is the situation people search for help with most often, and it needs honest expectations.
On a 2020 Honda HRV, an owner on r/car reported a damaged mounting post that required headliner removal and metal repair after a prior owner forced the visor off, and the dealership quoted the entire job. That is a realistic outcome when the post is gone.
There is an interim option. Some owners repair a sheared post with a length of machine screw and epoxy, or fit a small reinforcement bracket, which holds a replacement visor long enough to source a proper repair. It is not a permanent fix, and it is worth doing only if you need the visor to stay up on the drive home.
For the long term, the choices are a headliner-down bracket repair or a full trim replacement by a shop that works on roof liners. Once the headliner is down, replacing both visors at the same time is the sensible move.
Troubleshooting After Installation
Most problems after a swap come from three places. Work through them in order.
The visor will not lock in the up position. Cycle it down and up firmly to let the ratchet re-engage. If it still drops, the shell is not fully seated on the post or the pivot pawl is broken. Remove it and check that the post is straight and the bracket is square.
The vanity light flickers or works intermittently. The wiring harness is pinched between the bracket and the headliner. Power down, unplug, and reseat the connector until it clicks, then route the harness so it clears the fastener path.
The trim cover will not stay on. Either a clip on the cover is broken or the cover is being forced in at the wrong angle. Align the tabs and press along the whole edge evenly rather than pushing one corner.
It droops again within a week. Check that you did not overtighten into stripped plastic, and confirm the bracket screw reached metal rather than only threading into the housing.
Frequently Asked Questions
Is it easy to replace a sun visor in a car?
Yes. It is a beginner-level job that takes 10 to 20 minutes per visor with basic hand tools. You pry off a small plastic trim cover, remove two fasteners, unlock the pivot, slide the visor off its post, unplug the vanity light connector, and reverse the steps for the new part. The only tricky moment is releasing the pivot instead of pulling the visor down.
Can you replace a sun visor yourself?
You can, on almost any car. The headliner stays in place unless a previous owner bent or sheared the mounting post. If the post is intact, the whole job happens through the small trim cover at the base of the visor.
What tools are needed to replace a sun visor?
A plastic trim removal tool or thin card, a flathead and a Phillips screwdriver, a Torx bit set for many European and Asian models, a socket set for models using bolts, a work light, and gloves. Masking tape around the mounting point helps protect the headliner fabric.
How long does it take to replace a sun visor?
Most owners finish in 10 to 20 minutes per side once the trim cover is off. Allow extra time if the vanity light connector is brittle, if a trim clip snaps, or if the new visor has to be programmed for HomeLink.
How to fix a sun visor that keeps falling down?
First check the mounting screws with the visor in the down position and snug them up gently. If it still will not hold, the internal ratchet is worn and tightening will not fix it, so the pivot or the whole visor has to be replaced. Do not overtighten, because the threads sit in plastic and the housing will crack.
Are sun visors interchangeable between cars?
Rarely. Driver side visors are longer and usually carry the vanity light and a HomeLink button, while passenger side visors are shorter and often have no wiring. Roof type also matters, since panoramic sunroof models often use a different bracket. Match the part number, the interior colour code, and the side before you buy.
Where can I buy a replacement sun visor?
A dealership parts counter will look up the exact part from your VIN, online OEM and aftermarket suppliers let you compare colour codes and part numbers, and salvage yards or self-service wreckers let you inspect a used OEM visor in person. Check the part number against your original before you commit.
Do I need to disconnect the battery before removing the vanity light wiring?
For most vehicles, no. A visor light runs on a low-voltage fused circuit and the connector can be unplugged with the ignition off. Disconnecting the battery is only sensible if you are working near wiring that also feeds other circuits or if your vehicle requires it for a roof console removal.
Wrapping Up Your Sun Visor Replacement
Learning how to replace a car sun visor comes down to one habit: release the pivot and slide the visor along its post instead of pulling it away from the roof. Get the tools together, match the side and colour code, and the job is 10 to 20 minutes of careful work with the trim cover as the only real risk point.
If the post inside your headliner is already bent, stop and read the damaged post section before you start, because that is the one case where the headliner comes down. Otherwise, tape the fabric, work in daylight, and test the lock and the vanity light before you drive away.