
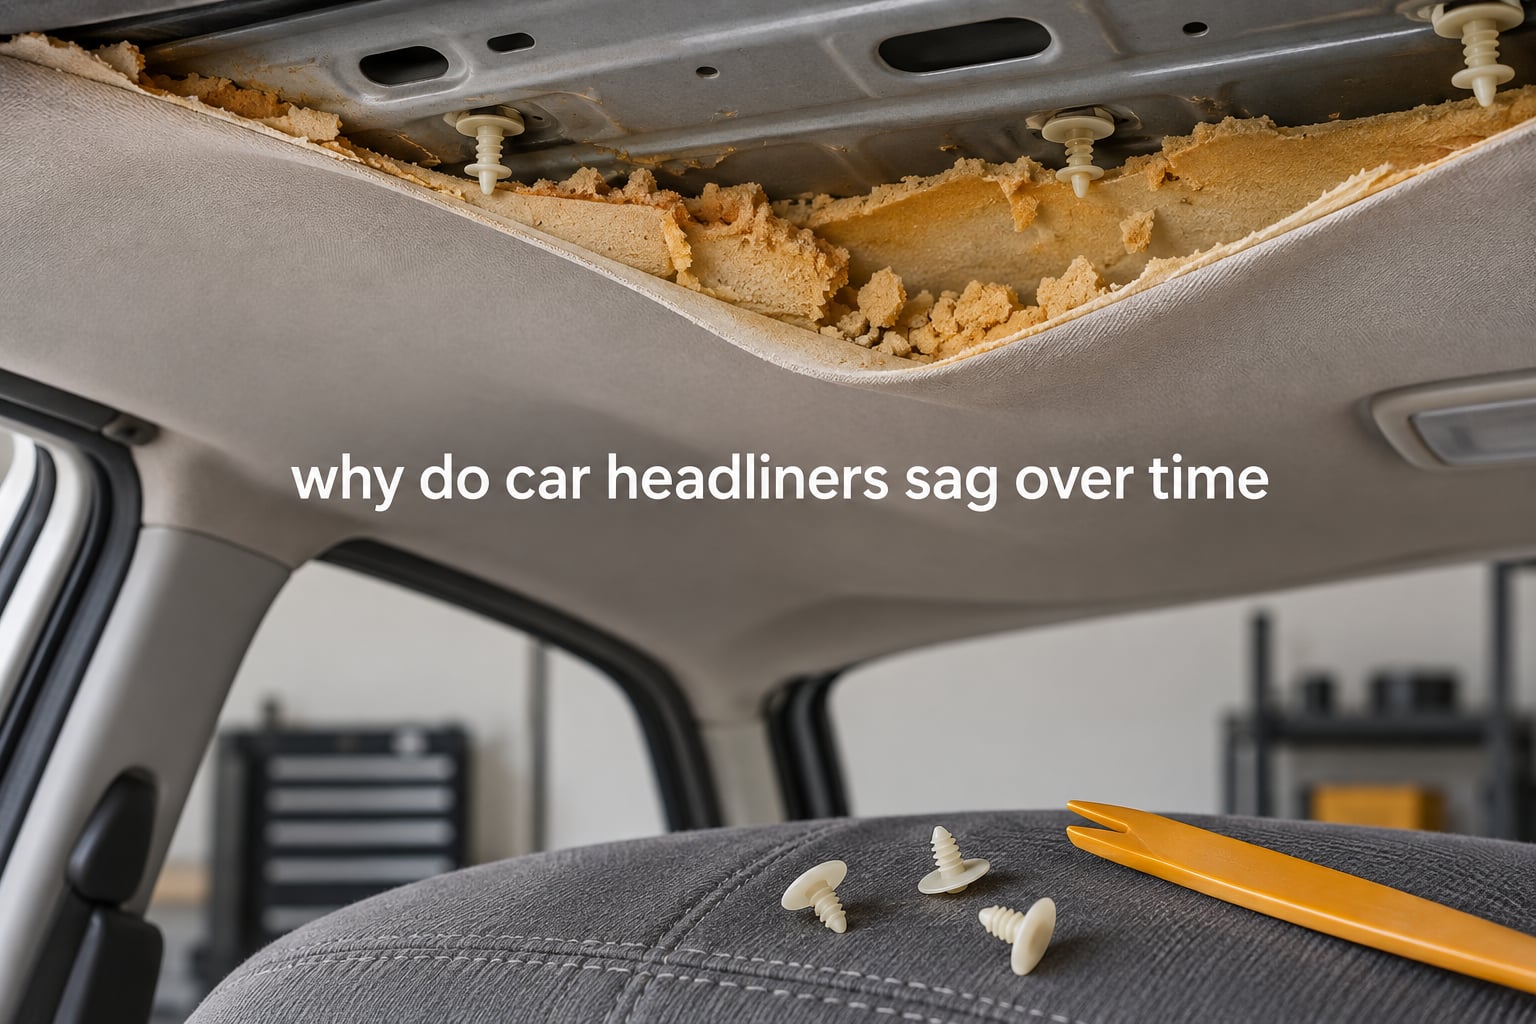
Short answer: Car headliners sag because the foam backing behind the fabric slowly breaks down into powder, and the hot-melt glue that held the fabric to it softens, creeps and lets go under heat. What is left is a fabric sheet with nothing solid underneath it, so it droops under its own weight.
If you have been searching for why do car headliners sag over time, you probably want more than a one-line explanation. Most of what circulates online stops at the phrase the foam deteriorated, which is true but leaves out the two different failures that look identical from the driver’s seat.
Over years of re-trimming roof liners, we see the same pattern repeatedly. The fabric has not torn and the glue has not simply washed away. Instead, the polyester foam has oxidised into a chalky crumb, the bond line has crept a few millimetres across the panel, and the two halves have quietly let go of each other. Understanding that sequence is what tells you whether a repair will hold.
What follows is a breakdown of the causes, how to tell foam failure apart from adhesive failure, what actually works as a fix, and where a professional re-trim earns its cost. Updated for October 2026.
Table of Contents
- What a Car Headliner Is Actually Made Of
- Why Do Car Headliners Sag Over Time?
- 1. The foam backing degrades and starts powdering
- 2. Heat softens the adhesive and it creeps downhill
- 3. Humidity and trapped condensation
- 4. Water intrusion from leaks, sunroof drains or the A/C drain
- 5. Ultraviolet and oxidation ageing of fabric and foam
- 6. The factory adhesive was never designed for a long service life
- 7. Mechanical load, previous repairs and roof accessories
- How to Tell Foam Failure Apart From Adhesive Failure
- Why Spray Glue Fails on a Sagging Headliner
- Quick Temporary Fixes You Can Do In Place
- Permanent Fix: How to Re-Upholster a Headliner Step by Step
- Tools and Materials for a DIY Headliner Repair
- What It Costs to Fix or Replace a Sagging Headliner
- How to Stop a New Headliner From Sagging Again
- When a Sagging Headliner Needs a Professional
- Frequently Asked Questions
- What could be causing my car’s headliner to sag?
- My car headliner is sagging. How can I fix it?
- Can I fix a sagging headliner without removing it?
- How can I repair a sagging roof lining in my car?
- Why does spray glue not work on a sagging headliner?
- How much does it cost to fix a saggy headliner?
- How much does it cost to replace a sagging headliner?
- Does AutoZone sell a headliner repair kit?
- Is a sagging headliner dangerous?
- Why does my headliner keep sagging after a repair?
- Conclusion
What a Car Headliner Is Actually Made Of
A headliner is not a single material. It is a small composite assembly, and every layer in it plays a part in whether it stays put for ten years or three.
- The fabric. Usually a polyester or non-woven material chosen for low cost and low weight. It carries the load of the whole assembly once the layers below it are gone.
- The foam backing. A thin open-cell polyester layer laminated to the back of the fabric. It gives the liner its shape, softens sound, and provides the solid surface the adhesive grips.
- The bond line. Factory headliners are usually bonded to the roof panel with a hot-melt adhesive applied as a web of dots or a spray pattern. It is strong when cool and soft when hot.
- The headliner bows and clips. A series of stamped steel or plastic bows that arc across the roof and slot into the pillars and side trim. They hold the fabric taut at the edges.
- Attachments. Sun visors, the rearview mirror, dome and map lights, and the grab handles all screw or clip into the liner or the panel behind it.
Two terms explain most failures. Delamination means the fabric has separated from its own foam backing, so the material peels away in a layer. Adhesive failure means the foam is still bonded to the fabric but has released from the steel roof panel. Both produce a sag, and both can happen at the same time.
A third term comes straight from adhesive manufacturers. Creep describes slow, permanent movement under sustained load. A hot-melt glue rated only to soften and re-harden rather than to resist creep will let the fabric slide downhill, one parked afternoon at a time.
Why Do Car Headliners Sag Over Time?
There are seven causes behind nearly every sagging headliner we see. They overlap constantly, and in a vehicle that has spent its life outdoors in a hot climate, most of them are running at once.
1. The foam backing degrades and starts powdering
This is the single most cited cause, and the consensus across owner forums from r/MechanicAdvice to bimmerforums is the same: the foam is deteriorating, so the fabric separates from its substrate and droops. Polyester foam is an oxidising material. Ultraviolet light, heat and humidity all attack the polymer chain, and it slowly loses the structure that made it rigid.
The tell is unmistakable once you have seen it. Press the sagging area and you feel a crumbly, slightly compressed surface rather than a firm one. Run a fingernail across it and the surface comes away as pale dust. Forum members regularly post photos of a removed liner whose backing looks like a dry sponge biscuit.
Once the foam has powdered, no adhesive can work properly, because the surface it needs to grab has turned into loose powder. This is the point of no return for a bond repair.
2. Heat softens the adhesive and it creeps downhill
A parked car in direct sun can push the roof panel well above the temperature of the surrounding air. Interior surface temperatures of a roof liner are commonly quoted far higher than outside readings, and the glue at the bond line is the first thing to soften as the temperature climbs.
Factory headliner adhesives are generally specified for a service range of roughly 60C to 125C. Bostik, one of the suppliers documenting this, states plainly that its hot melt adhesives for headliners are built for high heat resistance in that band specifically to prevent delamination, sagging and adhesive failure over time. When a bond sits at the soft end of its range for hours on end, the fabric does not fail suddenly. It slides, and the sag appears in the centre of the roof panel where there is nothing but gravity pulling down.
Cold weather does the same damage from the other direction. Repeated freeze and thaw cycles make a brittle foam more brittle and stress the bond line where it crosses a stamped rib in the roof panel.
3. Humidity and trapped condensation
Every car breathes through its cabin, and moisture exits partly through the headliner. A headliner that is already compromised absorbs that moisture and holds it against the foam, keeping the oxidising process permanently active. A vehicle driven in winter with wet shoes, or one with a leaking windscreen seal, can keep the liner damp for weeks.
Humid climates accelerate the whole curve. Liners in coastal and tropical regions tend to show visible sag years earlier than the same model kept dry, and the fabric in a damp headliner often develops a musty smell and a texture that feels spongy even before the sag is obvious.
4. Water intrusion from leaks, sunroof drains or the A/C drain
This is the cause most often missed, and it is worth checking before you spend anything on a cosmetic repair. A leaking headliner seam, a blocked sunroof drain channel, or a clogged evaporator condensate drain can soak the back of the liner locally. That soaked patch never dries, so the foam under it dissolves and the bond line fails around it.
Look for the pattern rather than the damp itself. A sag that forms in one defined area, often near a roof rail, a sunroof corner or a door opening, points to a leak. A sag spread evenly across the whole roof points to age and heat. Water staining on the headliner or a musty smell that appears after rain is a strong tell.
5. Ultraviolet and oxidation ageing of fabric and foam
Most headliner fabric is not UV stabilized to any meaningful degree because the original manufacturer assumed the roof panel would shield it. Once the liner starts to detach, sunlight reaches surfaces that were designed to stay in the dark, and the degradation rate steps up sharply.
You can see this in the fabric itself. A failing liner often goes pale, dusty and brittle, and a sagging panel that has been exposed will crack when you pinch it. Colour and hand-feel change a good deal faster than most owners expect.
6. The factory adhesive was never designed for a long service life
Automotive manufacturers design to a target life and a factory-quoted budget. A headliner that is still intact and tight at fifteen years has outperformed its specification, not met it. Once the production run of a car ended, the exact glue and foam combination used on it became harder to source, and aftermarket replacements are frequently chosen for shelf life and cost rather than for the 125C end of the temperature range.
This matters for the parts you buy. A general-purpose contact adhesive and a dedicated headliner adhesive can look identical on the shelf and behave completely differently in a car interior at 70C.
7. Mechanical load, previous repairs and roof accessories
Not every sag is chemical. Roof racks, light bars, roof-mounted cargo boxes and interior accessories that clip or screw to the headliner all apply load to a material that was never designed to carry it. Alarms, radar detectors and camera mounts that draw power through the headliner add holes and stress concentrations to the panel.
Previous repairs belong here too. Staples driven through a sagging liner, a spray adhesive layer over powdery foam, or a home fix using a hot glue gun all leave a surface that fails again within months. On r/Trucks a user described a heat gun used to re-melt the old glue burning a hole straight through the fabric, which ended that repair attempt and required a full replacement instead. That failure is common enough to call out separately below.
How to Tell Foam Failure Apart From Adhesive Failure
This is the diagnostic question that decides whether a repair is worth attempting, and it takes about five minutes. Start by finding the edge of the sag with a flashlight and look at the transition between tight and loose material.
Fabric peeling away from its own foam. You will see a raised lip or a thin flap at the edge of the loose area, often with a layer of white foam visible on the underside of the folded fabric. The exposed foam is pale and crumbly. This is foam failure, and it means the panel underneath is probably still clean.
Foam still attached to the fabric but released from the panel. Here the material peels as one thick sheet, the full foam thickness, and the back of it is tacky or dry depending on the age of the glue. The roof panel underneath often shows a clean outline of where the adhesive used to be. This is adhesive failure, and it may still be repairable if the foam is intact.
Sagging with a visible dent in the roof panel. Water getting in through a blocked drain often pulls corrosion out of the seam underneath. A bubbling, flaking or gritty patch on the steel means the problem is structural and moisture-driven, and no amount of fabric work will hold a new liner over it.
Sag concentrated around the mirror or the sun visors. These areas carry extra weight and take repeated handling. If the fabric is sound and the foam is firm, the failure is mechanical strain around the anchors rather than material decay.
A quick physical test settles it. Press firmly on the sagging area and then rub the exposed surface with a fingertip. If powder transfers to your finger, the foam is gone. If it feels firm but moves, the bond has let go and the substrate is still viable.
Why Spray Glue Fails on a Sagging Headliner
The most important sentence in this whole subject is short. Spraying glue over old, degraded foam fails because the glue has nothing solid to stick to.
Spray adhesive works by flowing into the surface of a substrate and hardening there. On a sound foam backing it is perfectly adequate for a light refresh, and on a factory-fresh liner it is a reasonable short-term tool. On powdery foam it is applying itself to loose dust. The film forms on top of the powder, grips nothing underneath, and the first warm day peels the whole layer back down.
Owners describe exactly this loop. On r/MechanicAdvice, a fabric-store spray adhesive on a 95 Accord produced a temporary improvement only. On r/Volvo the debate splits cleanly: some owners swear by the spray, others say a full re-do is the only fix that survives, and the honest answer is that both are describing the same material in different condition. Where the foam is firm, spray works. Where the foam has powdered, nothing works.
The second reason craft spray underperforms is temperature. A product chosen for paper, cork or fabric in a cool room is not specified for a roof panel at interior peak temperature. The correct product class is a headliner adhesive from 3M or Permatex, which is formulated for automotive interiors, and these are also available in solid film and cartridge forms that bond to the roof panel directly instead of soaking into fabric.
Over-spraying is the other common mistake. A heavy coat takes days to cure properly, traps its own solvent, and leaves a stiff layer that wrinkles when the fabric is stretched. Thin, even coats cure faster and hold better than one heavy pass.
Quick Temporary Fixes You Can Do In Place
Can you fix a sagging headliner without removing it? Yes, as a holding action, and it is worth doing while you decide about a permanent repair. This is the method owners on JaguarForums describe as curing the immediate problem, but nothing more. Expect weeks to months, not years.
- Work in cool conditions. Park in shade and let the roof panel cool completely before you touch the liner. Warm fabric and warm glue both fight you.
- Clean the fabric. Vacuum the sagging area, then wipe it with a damp cloth and a little isopropyl alcohol to remove dust and oils. Glue will not bond to a dusty surface.
- Lift the liner back into position by hand. Push the sag upward and hold it in place for a moment to confirm it will sit against the panel. If the foam is powdering, the liner will spring back down immediately, which is your signal to stop.
- Mark the bow positions with a pencil. With the liner held up, note where each existing headliner bow crosses the panel so you can reinstall them in the same spots.
- Drive twist pins or upholstery pins through the fabric into the bow or the roof seam. Work from the centre outward and pull each area taut as you go. Many owners on cartalk report driving staples at roughly 12 inch intervals as an accepted permanent-enough method on older vehicles, particularly on certain Saab and Mercedes models.
- Cut the pins close and cover. Snip the excess pin length off flush and press the fabric flat so it does not scratch the head or catch on clothing.
What to expect from this fix. Pins hold the fabric but do nothing for the material underneath. On a car in a hot climate, expect the sag to return within weeks to months. Pins also eventually tear the fabric further as you move in and out of the car, which is the main complaint from owners who have tried it.
Do not use a hot glue gun. It deposits a thick, brittle bead that shows through the fabric, cannot be reversed, and pulls the material apart as the panel flexes. It also makes any later professional re-trim more expensive because the bead has to be scraped off the panel.
Permanent Fix: How to Re-Upholster a Headliner Step by Step
A permanent repair means removing the old liner, cleaning or replacing the board, and bonding new fabric into the correct profile. On a car with a sunroof the fabric is split into panels, which adds work but follows the same logic.
- Remove the trim in order. Sun visors, the rearview mirror, the dome and map lights, the rear grab handles, the A-pillar trim and the upper door frames come off first. Bimmerforums and owner threads agree that this teardown is more involved than most people expect, and it is the part owners most often underestimate.
- Take out the headliner bows. Release each bow from its clips and slide them out, noting their positions. Number them if the pattern is not symmetric.
- Pull the liner down carefully. Ease the fabric out from the roof rail channels rather than yanking it. A liner that has been in place for years can tear along the door opening.
- Inspect the board and the panel. Look for rust at the seams, water staining, and areas where the foam residue has left the metal gritty. Address any corrosion before bonding anything.
- Remove the old foam. Shave the board down with a broad blade or a scraper, working with the grain of the metal. Sand lightly and vacuum thoroughly. A board that is not clean will not bond.
- Replace the board if the foam is shot. If the foam is powdering or water-damaged, cleaning will not be enough. A fresh headliner board is inexpensive and gives the new fabric a real substrate to stick to.
- Select the adhesive. A purpose-made headliner adhesive from 3M or Permatex is the right choice. Follow the open time on the product and do not bond until the surface is tacky as specified.
- Fit the fabric and staple or pin it to the bow. Stretch the material evenly and keep the grain straight. Owners on r/Volvo point out that fabric which stretches in only one direction bunches up at the rear, so buy material that stretches in both directions.
- Reinstall the bows, visors, mirror and lights. Reuse the original clips where they are intact, and replace any that have become brittle.
Warning about heat guns. A heat gun held close to old adhesive can melt straight through polyester fabric and leave a permanent hole, which is exactly what happened to the owner on r/Trucks. If you use heat to soften old residue, keep the nozzle moving, keep it well back, and work on the bare board rather than over the fabric.
Tools and Materials for a DIY Headliner Repair
You do not need much, but the adhesive choice matters more than anything else on the list. Not all glues behave the same way at 70C.
- Purpose-made headliner adhesive. 3M and Permatex both make products specified for automotive headliners. This is the correct product class for a permanent repair.
- Craft or fabric spray adhesive. Fine for a light refresh on a firm liner. Not specified for automotive temperature, and useless on powdery foam.
- Contact cement. Bonds well to the roof panel and is often used for the board itself, but it is aggressive, fumes heavily, and can dissolve certain fabrics. Use it on the board, not on the visible liner.
- Epoxy. Too rigid for a headliner. It does not flex with the panel and will crack at the edges of the roof opening.
- Hot-melt glue gun. Not recommended. Thick, rigid, unsightly and impossible to remove cleanly later.
- Replacement fabric. Choose a material that stretches in both directions and matches the original grain. Vinyl and leather are common on later vehicles but do not breathe, which concentrates any moisture that gets behind them.
- Tool list. A broad blade or upholstery scraper, a sanding block, a vacuum, twist pins or upholstery pins, a staple gun if the original used staples, trim removal tools, and replacement clips.
For anyone wondering whether the big-box auto supply counter sells a ready-made kit, the honest answer is that most kits contain pins and a small can of general adhesive. The pins are useful. The adhesive is adequate for a temporary hold and not much more.
What It Costs to Fix or Replace a Sagging Headliner
Headliner work is priced by labour rather than parts, and the labour is the part that surprises people. The fabric and board are a minor share of the job.
What drives a professional quote is the vehicle itself. A two-door coupe with a simple roof and one bow pattern is straightforward. A four-door with headroom for a rear seat, sun visors with vanity mirrors, a sunroof, dome and map lights, and rear speakers in the sail panels adds hours to the teardown. A full headliner removal on a large SUV or van is a much longer job again than the equivalent work on a small hatchback.
Three things change the price further. A water-damaged board with corrosion underneath needs metal work before the liner can be refitted. A car with aftermarket roof accessories or a previous failed repair adds strip-out time. And a vehicle that has never had a headliner removed often has clips and trim clips that are brittle and break on the way out, which is a contingency every trimmer builds into the estimate.
On the trade side, we are asked most often whether a sagging headliner is worth fixing on a car that is already high mileage. The honest answer is that a headliner is cosmetic unless it blocks your view, it is one of the cheaper interior jobs we do, and the value of a clean roof often rises sharply when the car goes up for sale or a sale. What is not worth doing is paying for a re-trim on a board that has active rust underneath, because the new liner will fail the same way the old one did.
Get a quote that itemises the teardown, the board work and the refit separately. If the quote is a single number with no detail, ask what happens if the clips break.
How to Stop a New Headliner From Sagging Again
A replacement headliner is a fifteen-year fix at best, and only if you remove the conditions that caused the first one. These are the checks that matter.
- Fit a sunshade every time. The single highest-impact habit. A sunshade drops cabin surface temperature noticeably and cuts the ultraviolet load on the fabric and foam.
- Park in shade or a garage where you can. Creep is driven by time at temperature, not by peak temperature alone. Fewer hours above the soft point of the glue means less permanent movement.
- Check for leaks before you start. Clean the sunroof drain channels, confirm the evaporator condensate drain is clear and runs where it should, and examine headliner seams. A new liner in a car that leaks will fail in the same spot.
- Do not overload the roof. Distribute weight on roof racks, keep heavy cargo low, and remember that every accessory mounted through the headliner is a stress point.
- Keep the interior dry. Fix leaking window seals and use a mat rather than a soaked carpet. Persistent damp keeps the oxidation cycle running.
- Ask for a two-sided fabric. If the vehicle is used hard, re-trimming in a breathable, two-direction stretch fabric gives any trapped moisture somewhere to go.
- Check the liner every couple of years. Run your hand along the sun visor edge and the rear door opening. Catching a small local lift early is far easier than dealing with a full sag.
In hot, dry, high-UV climates the fabric and foam half of the problem dominates. In humid or coastal climates, moisture and drainage dominate. In cold climates with road salt, corrosion underneath the board is the thing to watch.
When a Sagging Headliner Needs a Professional
There are four situations where a home repair is the wrong call.
The sag is in your sightline. A liner drooping over the rearview mirror or hanging in the rear window area blocks the view and can catch on the sun visor. That is a safety issue and a legal one in many jurisdictions. Owners regularly ask whether a sagging headliner is dangerous, and the fair answer is that a sagging liner is rarely dangerous to drive, but a blocked view is a genuine hazard.
There is water damage or corrosion. Bubbling paint, a gritty roof rail, rust bleed at a seam, or a musty smell that appears after rain all mean the substrate is compromised. Fabric work on top of active corrosion will fail twice.
You cannot get the old liner out without tearing it. A liner that has fused to the board across large areas usually means the whole board has to come down. That is a workshop job with the correct removal tools.
It has already been repaired once and sagged again. A second failure usually means the first repair was done over degraded foam or a dirty board. Without stripping back to sound material, a third attempt costs the same and lasts the same.
At Segal Motor Trimmings we spend most days re-trimming roof liners, and the pattern of what actually failed is the most useful thing we can tell an owner. A liner that has separated from its own foam needs a new board, not new glue. A liner that released cleanly from a clean panel needs a better adhesive and a cooler parking habit. A liner that failed over a rust stain needs the leak fixed first. Getting that diagnosis right before the work starts is what separates a repair that lasts from one that sags again within a season.
Frequently Asked Questions
What could be causing my car’s headliner to sag?
The most common cause is degradation of the foam backing behind the fabric, which turns brittle and powdery so the fabric separates from it. Heat-softened adhesive that creeps downhill, trapped humidity, water ingress from a blocked drain or leak, and UV ageing all contribute. Many cars show a combination of foam failure and adhesive failure at the same time.
My car headliner is sagging. How can I fix it?
For a quick fix, hold the liner up and secure it with twist pins or upholstery pins driven into the existing headliner bows. That is a holding action lasting weeks to months. For a permanent fix the liner must come down, the board must be cleaned or replaced, and new fabric bonded on with a purpose-made headliner adhesive.
Can I fix a sagging headliner without removing it?
You can hold a sagging liner in place in situ using twist pins, upholstery pins or clips worked into the headliner bows. This restores the appearance temporarily but does nothing for the degraded material underneath, so the sag returns once the pins loosen. Owners describe it as a holding action rather than a repair.
How can I repair a sagging roof lining in my car?
The permanent process is to remove the visors, mirror, lights, grab handles and trim, take out the headliner bows, pull the liner down, strip and inspect the board, then bond new fabric with a headliner adhesive and refit the bows and trim. If the foam is powdering the board needs replacing, because glue cannot bond to powder.
Why does spray glue not work on a sagging headliner?
Spray adhesive needs a solid surface to grip. When the foam backing has degraded into powder, the spray forms a film on top of loose dust with nothing underneath, so it peels away again within weeks. Owners report pushing the liner back up with fabric spray and finding it sagging again within an hour of the car warming up.
How much does it cost to fix a saggy headliner?
Headliner work is priced on labour, not parts, because the teardown and refit take far longer than the materials cost. A simple two-door roof is the quickest job, while four-door cars, sunroofs, sun visors, sail-panel speakers and extra lamps all add hours. Corrosion on the board and a previous failed repair add further time.
How much does it cost to replace a sagging headliner?
Replacement costs the same as a repair because the old liner has to come out either way. The quote is driven by vehicle size, roof complexity, sound and lighting equipment, and the condition of the board underneath. Get the teardown, board work and refit itemised separately so you can see where the time is going.
Does AutoZone sell a headliner repair kit?
Auto supply kits typically contain twist pins and a small can of general-purpose adhesive. The pins are genuinely useful for a temporary hold. The adhesive is not a headliner adhesive and is not specified for automotive interior temperatures, so it is a short-term measure at best.
Is a sagging headliner dangerous?
A sagging liner is usually cosmetic rather than dangerous. It becomes a safety concern when it droops across the rearview mirror, hangs into the rear window area, or blocks a sun visor. In those cases treat it as a visibility problem and get it pinned or re-trimmed before it gets worse.
Why does my headliner keep sagging after a repair?
Most second failures come from one of three causes. The repair was done over foam that had already powdered, so there was nothing for the glue to bond to. The board was not cleaned back to bare metal before the new liner went on. Or the original cause is still present, such as a blocked sunroof drain or a leak keeping the area permanently damp.
Conclusion
Car headliners sag because a composite bond fails from both sides at once. The foam backing oxidises into powder, the hot-melt adhesive softens in a hot cabin and creeps slowly downhill, and once those two layers are gone the fabric has nothing to hold it and it droops under its own weight.
That is why do car headliners sag over time has a simple answer, and why the repair is not simple. Work out whether you have foam failure, adhesive failure or water damage before you buy anything. Pin the liner up if the sag is in your sightline. Check the drains and seams. And if the foam has powdered, stop trying to glue it back, because a new board and a proper headliner adhesive are the only combination that will last.